How to Prune and Train Plants to Achieve Higher Yields
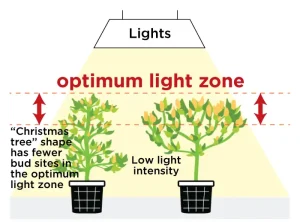
Fig 8.1 Topping and LST positions more bud sites in the optimum light zone
When growing indoors, higher yields are obtained by training plants into a low, wide and flat canopy. This promotes more flowering sites and positions them in the zone of optimum light intensity (Fig 8.1). This ‘form’ can be achieved through a combination of “topping” followed by Low Stress Training (LST):
1. Topping is effectively used to obtain multiple, even-sized floral sites. 2. LST is then used to bring these floral sites to the same height to maximize grow lamp efficiency.
STEP 1. Topping: When and How to ‘Top’?
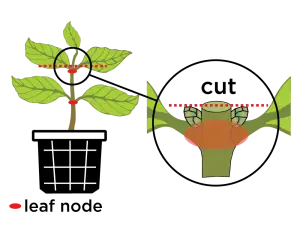
Fig 8.2 How to top a plant? Topping above the 2nd node allows 2 axillary buds (in black circle) to grow out and form 2 branches.
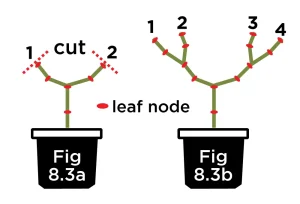
Topping is best done when the plant is very young (less than 2-3 weeks old) and has only 2-5 nodes in total. Topping is the removal of the plants ‘top’ growth just above a node (fig 8.2). Once topped, the two axillary buds immediately below the cut will then grow out into two new branches. Once these new branches grow out to 1 or 2 leaf sets (or nodes) they can be topped again (Fig 8.3a). This second round of topping will grow out to form four even-sized branches (potential bud sites – see fig 8.3b).
Important Points for Topping:
1. Topping can be done more than twice however doing so will increase time in vegetative phase. Test to see what is most productive. Some experienced growers will top up to 5 times (or more) to obtain 32 branches and can be well rewarded for their efforts.
Fig 8.3a A second round of topping will grow out to form 4 even branches (Fig 8.3b). (Leaves removed to simplify drawing)
2. Healthy plants usually take 2-3 days to recover from topping. After topping, do not remove the leaves from that node as these are needed to power growth of the branches from that node. Never top during flowering as it causes too much stress – which slows growth and inhibits yield. Do not top unhealthy plants. Also, avoid topping older, thicker growth as this takes longer to heal.
STEP 2. Low Stress Training (LST)
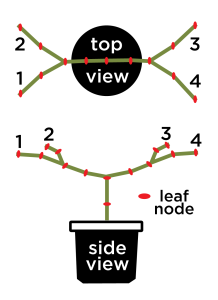
After topping (done twice in the scenario above – Fig 8.3b) there are four quality branches (or bud sites) growing vertically from what was originally the top node. LST involves pulling these branches downwards (to horizontal) and outwards (i.e. “star” configuration) so that all four branches are spread apart from one another, horizontal and at the same height (Fig 8.4). The lower branches from the nodes ‘below’ where topping occurred are now also closer and more exposed to the light. As these grow up they can be topped and manipulated using LST.
Important Points for LST:
Fig 8.4 LST applied to plant in Fig 8.3b (Leaves removed to simplify drawing)
1. When to Start and Finish LST?LST should be started as soon as possible during the vegetative phase.
FloraMax Resin-XS has an huge impact on trichome size, resin and oil. Resin-XS also aids PGR recovery.
Flowering phase can commence once all major branches are horizontal and level with each other. Budding can be triggered by switching lights to 12-on, 12-off. LST should continue during early flowering as vegetative growth continues. Maintain a flat, level branch structure. Vegetative growth will eventually stop when the plant is putting most of its energy into flowering. Minimal adjustment is required after this point – apart from keeping shade away from key areas. It can be beneficial to remove small, lower growth as this helps improve ventilation through the canopy and prevents infestations or infections due to foliage being in contact with soil.
2. Bending Branches: Young growth is easier to bend than older growth. Also some species/ strains are easier than others. Do not rush to get branches horizontal, do this in stages. When a branch is first bent, growth will be slowed. Foliage will re-orientate towards the light then eventually start to grow. LST again once it grows another 3 inches or so.
How to Secure Branches for LST?
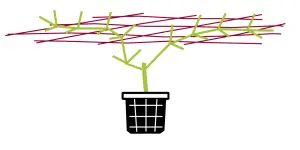
Fig 8.5 Strategic pruning (topping) and low stress training (LST) combined with horizontal netting will create a plant that uses light most efficiently.
Adopt a method that is strong enough to support the plant during flowering and allows access to manage the growing plants, conduct cleaning and other maintenance:
1. Gardening Wire or Landscape Stakes:
FloraMax Silica contains Monosilicic Acid. This forms a quartz-like structure in plant cells which prevents leaf wilt and improves stem rigidity.
This method is effective during the early growth stages soon after topping. Branches can be held in place with wire that is anchored to screws in the pot, or some other structure. As the plant grows the wires need to be tightened however ensure the main stem remains vertical.
2. Screen or Netting: A square or rectangular frame needs to be securely erected with either netting stretched over it or create a grid pattern using string woven through eyelets that are screwed into the frame.
Fig 13.4 Correct pruning technique: The “collar” mark is usually visable on woody growth. Cut immediately in front of this. This cut will heal quicker and minimizes the risk of pest attack and disease ingress.
The holes in the grid or netting need to be at least 2×2” or 5x5cm. Depending upon the species, the screen is normally mounted low enough (approx 1-1 ½ ft / 30-45cm) from the plant’s base so all the lower branches can grow up to the screen and gain access to direct light (Fig 8.5). As the plant grows, the growing tips need to be lowered back under the netting and directed into the next empty space in the screen.
Why do Topping & LST Impact the Plant?
In most species, the terminal bud or branch dominates growth to form a Christmas tree shaped plant. The growth of lateral stems and their floral sites is a lot slower than the terminal bud. Topping & LST disrupts a plant’s hormones (auxins) which triggers the plant to “prioritize” growth more evenly to all nodes. Consequently lower branches will catch up to those higher on the plant and yield more bud sites and more evenly sized fruits. The plant also tends to grow bushier and shorter which is more suitable for indoor lighting.